Recipes for Disaster: Asphalt Mosaics
:A Hot Weather Activity for Lonely Asphalt Near You
We’ve just reprinted our classic manual for direct action, Recipes for Disaster. You can order a copy here. To celebrate, here’s one of the first chapters, a guide to installing unsanctioned mosaics in asphalt streets and parking lots.
In the course of the years of research that went into the book, our contributors experimented with a wide array of tactics—some drawn from protest movements, others from outsider art. Some of the most inspired participants in Recipes for Disaster reverse-engineered the process by which a mysterious street artist in their region had installed cryptic tiles in the streets. At the time, almost no one had heard of these “Toynbee tiles.” In the years since, they have become legendary, inspiring an entire mythology.
After we publicized the method in 2004, other tiles began to appear around the country. Others eventually made their own pop-culture guides to the art form; in 2011, a film appeared about the original artist. Yet we have yet to see asphalt mosaics themselves become widespread.
So just in time for summer—which softens up the asphalt, the better to receive your mosaics—we offer the following how-to guide. We’ve also added an account that postdates the book. Carry out these instructions and send us photographs of your work!
Asphalt Mosaics
This is a method for making colorful, permanent mosaic installations in asphalt roads and lots. Like glass, asphalt is amorphous, somewhere between a liquid and a solid; this means that a design affixed to it with more asphalt will eventually settle in and become a part of it. We owe our awareness of this technique to a nameless mystic we have never encountered in person.

“You must make and glue tiles!! You!!!! As media!”
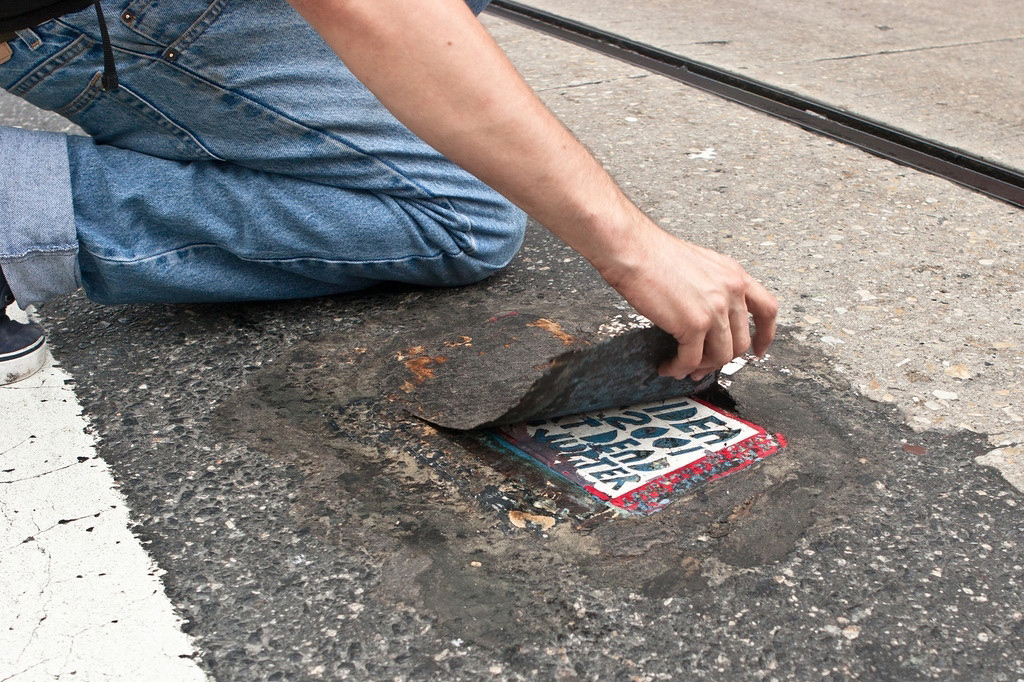
We saw the first one in Pittsburgh, Pennsylvania. We were walking along a downtown street when we spotted a colorful patch of text embedded in the asphalt of a crosswalk. It was clearly made of vinyl floor tile—but how was it attached? We found the pictured on the left at the corner of Smithfield Street and Oliver Avenue. As we walked we saw more versions of the same design. While befuddled by the message, we were amazed by the technique, and avidly discussed how it might be reproduced. But a few blocks later, miraculously, we came upon the Rosetta Stone, a similar piece of the same material and text… except that this one featured an additional block of smaller text: instructions! The words were old and badly damaged, but we could just make out the crucial sentence: “…I USE ASPHALT CRACK FILLER…” We got right to work.
The next time we came through Pittsburgh we were on tour. Part of our program was a skill share on asphalt décor, and we had already left a respectable trail of color across the country. After our workshop, we ventured downtown to visit the original pieces. When we got there, we found most of them—but the crucial piece, the one with the instructions, were gone. It had been buried under a fresh slab of asphalt. We had discovered it in the nick of time.
In a subsequent internet search, we found that the same text has been spotted all over the world, though mostly in North and South America. There even seems to be a fan club. According to one posting, a piece in New York starts with the same Toynbee text, then adds, “Murder every journalist, I beg you.” Well, we would never be so impolite, but between that and the kindly instructions provided in Pittsburgh, it’s clear where the artist stands on do-it-yourself media.
So, in the spirit of the inventor who was thoughtful enough to declassify his or her technique, we present the findings of our attempts to reverse-engineer it. Now, go make and glue tiles!! You!!! As media!!!
Ingredients
The so-called “Toynbee Tiles” are made out of two kinds of floor covering material: Vinyl Composition Tile and true Linoleum.
- Vinyl Composition Tile: The text is vinyl composition tile, also called “VCT.” VCT works because its color is solid, so when it wears down it still looks good. What will not work is the variety of self-adhesive, so-called “linoleum” tiles sold in hardware and tile stores. The surface of those tiles, whether it is a color or faux marble, is paper-thin veneer. When it wears down, it reveals its white substrate. For Christ’s sake, don’t even use those on your kitchen floor!
VCT is cheap, even brand new. It sells for less than sixty cents a square foot at hardware marts. The problem is that color selection is generally limited to a few bland options when you’re only buying single tiles. They do come in exciting colors, though, and if you want to order a case you can get almost any color you want; however, a case is expensive, and it’s unlikely that you will ever need forty-five square feet of any one color, so we have some other recommendations.
A lot of cites these days have salvage building-supply warehouses. They are often non-profit and community-run. These are a good place to start, as they usually have partial cases in a variety of colors. We have also had luck calling and stopping by floor covering stores and/or installation contractors. We ask if they have any partial cases in their storage area that we could have for an art project. Sometimes they are generous, sometimes they ask for a little money. Another method that has worked well with other materials is a classified “want ad” in the local paper. If someone has redone their own kitchen floor, they may have a partial box that they couldn’t bring themselves to toss but don’t really need. People love to donate these kinds of materials to starving artists.
- Linoleum: The background of the Toynbee tiles is made of linoleum. Like VCT, linoleum is solid color through and through. But beware—the word “linoleum” is also used generically to refer to any non-ceramic floor tile. True linoleum is a specific product made of flax fiber and linseed oil. You must use the real thing. Like carpet, linoleum mostly comes in rolls, and has to be cut and fitted into place when installed. For this reason, it is highly likely that you will be able to get cut-offs for cheap or free from an installation contractor or salvage lot.
- Asphalt crack filler: Asphalt crack filler is acrylic-based liquid tar made for filling cracks in asphalt driveways. It is available in most hardware stores, especially in the summertime, when it is best applied. It comes in one-gallon jugs. We have found many brands, but just two basic types. The regular strength stuff says that it will fill cracks of up to half an inch. The maximum strength product says it will fill 3/4-inch cracks and last longer. Both work, but for the minimal price difference, we lean toward the heavy-duty stuff. It goes for around $7.50 a gallon. One gallon is good for a dozen or more one-square-foot designs.
- Cardboard or Plywood Board: For an area as big as your design, in good condition and flat with no creases or dents.
- Tarpaper
- Waterproof Wood Glue
- Utility Knife (with plenty of blades, as they dull quick on VCT)
- Metal Ruler or Straight Edge
- Stapler or Tape
- Heat Gun (optional, but helpful)
Instructions
You have two options for creating your design. You can make mosaics, or you can make what we’ll call Toynbee-style pieces, in which your text or image is set into a solid background.
Mosaics
The advantage of the mosaic approach is that they can be made with VCT alone. You may find VCT to be easier to obtain than linoleum. Because of its brittleness, VCT is hard to cut into precise shapes such as small letters, and large pieces of it can crack apart as the road shifts with temperature and pressure. Mosaics circumvent these problems, by piecing together small, randomly cut pieces of tiles to form a design.
First, you have to make whole tiles into pieces. We’ve developed a method for producing durable pieces of irregular shapes. Using a utility knife and straightedge, score a line 1/2 to 3/4 inch from the edge of a tile (figure 1.1). Now Gently work from one end of the line to another, bending the strip away from the score line. The crack will become deeper and deeper, until it finally breaks. Once you have removed the strip, score it cross-ways to make smaller bits (figure 1.2). It is best to make a wide variety of shapes: squares, rectangles, rhombi, triangles. The more variety you have, the easier it will be to put your image together.
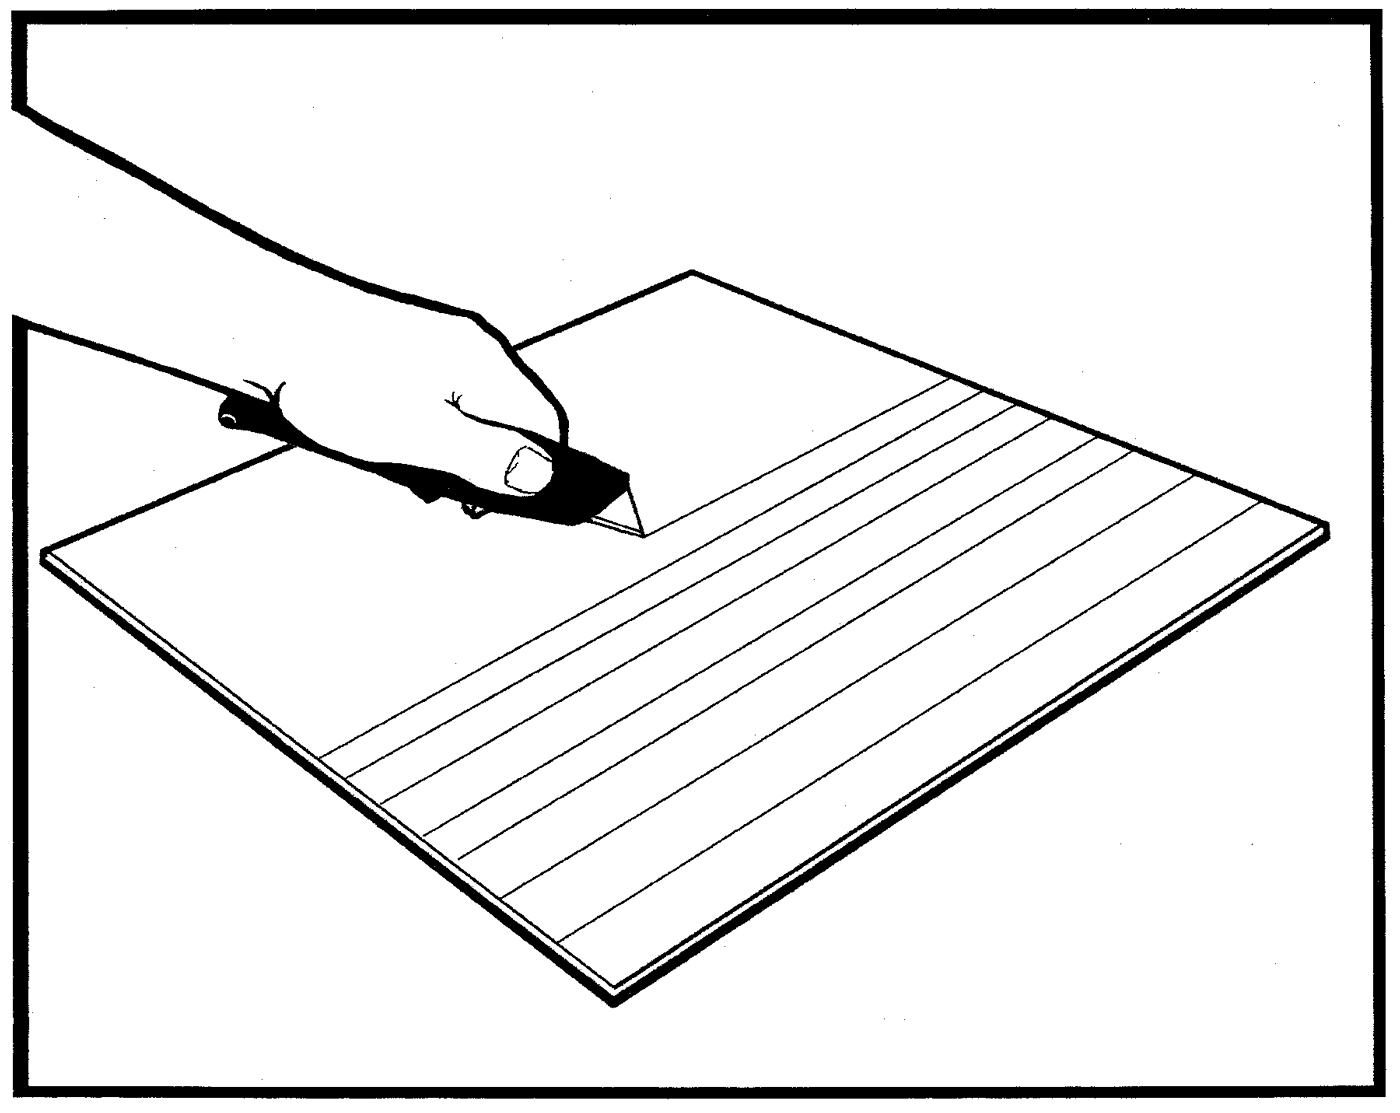
Figure 1.1.
Next, you need a flat surface. It is best to work on a flat piece of plywood or thick cardboard, so you can move your piece as necessary. Cut out a piece of tarpaper that is larger than your design, and tape or staple it to your work surface. The tarpaper needs to be flat and smooth; tears or wrinkles will mess things up.
Smear the surface of the tarpaper with an even coat of waterproof wood glue. The glue-cover area should extend one or two inches beyond the edge of your design on all sides. Let the glue dry thoroughly.

Figure 1.2.
Prepare the surface for layout. With a cloth, spread a thin layer of glue on the dry glue. This will cause the letters to stick to the glue surface.

Figure 1.3.
Lay out your design on the glue-coated tarpaper (figure 1.3). If the glue dries before you get all the tile down, add a thin layer of fresh glue. Laying out the tile pieces will appeal to your compulsive side. Put them down like a puzzle, custom-shaping pieces if need be. Aim to maintain consistent 1/8-inch gaps between tiles; as the tile itself is 1/8-inch thick, you can use a piece of tile as a guide (figure 1.4). If the tiles are too close to one another, the tar will have trouble flowing between pieces; if they are too far apart, the tar will span the gap, but it will be a weak spot. A consistent layout will also make your design more readable.

Figure 1.4.
Keep your design at least one inch away from the edge of your plastic, staples, or tape.
If you are using text, lay it out backwards. This is easy to forget! What you see when you are laying out your image will actually be the underside when it is installed.
Allow the second layer of glue to dry thoroughly. Before you move on to adding tar make sure no tile bits are loose. If one is loose, glue it back down.
Shake the jug of asphalt crack filler thoroughly and pour it over your design (figure 1.5). The ideal consistency of the crack filler is like honey. If the brand you are using is too thick, place the jug in the sun so it will flow better; you can also try adding a little water. The important part of this step is to get the tar between the tiles. The surfaces of the tiles need not be tar-free, but you should be able to see the shapes and some of the colors of the tiles. When the entire design is covered, add a 1/2-inch border of tar beyond the edge of the tiles.
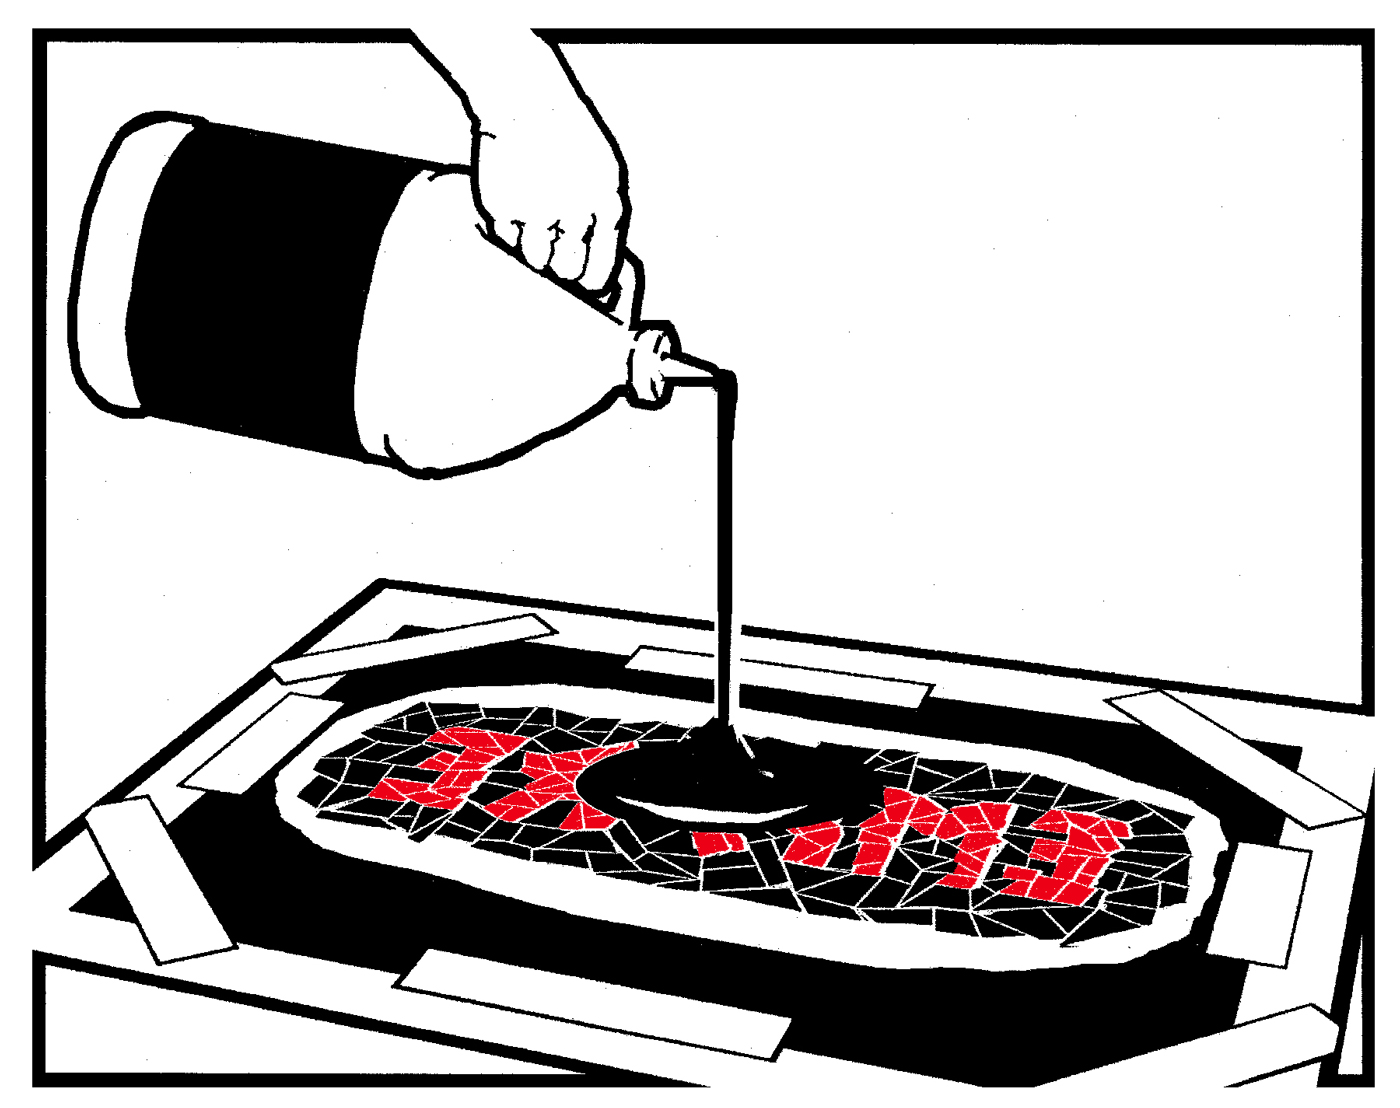
Figure 1.5.
Cut a piece of tarpaper in the shape of your design and, while the tar is still wet, press the tarpaper into the tar. If the paper starts to curl at the edges do something to hold it down. Once the tarpaper is stuck flat, spread another layer of tar on the back of the tarpaper, so it is completely coated with tar. This second layer of tar should be no more than 1/16-inch thick.
Refer to “Finishing and Installing” below to complete your project.
Toynbee-Style Designs
The Toynbee method is laborious, but it looks fantastic, and produces installations that are, by some indications, more durable than mosaics. For our example, we will assume you are using text, although you can use an image instead.
First, cut your text out of either VCT or linoleum (figure 1.6). It is worth your while to use a very sharp utility blade for this. Both linoleum and VCT become soft and easier to cut if left in the sun; if you are doing anything intricate, a heat gun makes the stuff cut like butter. If need be, you can make difficult letters on more than one piece.
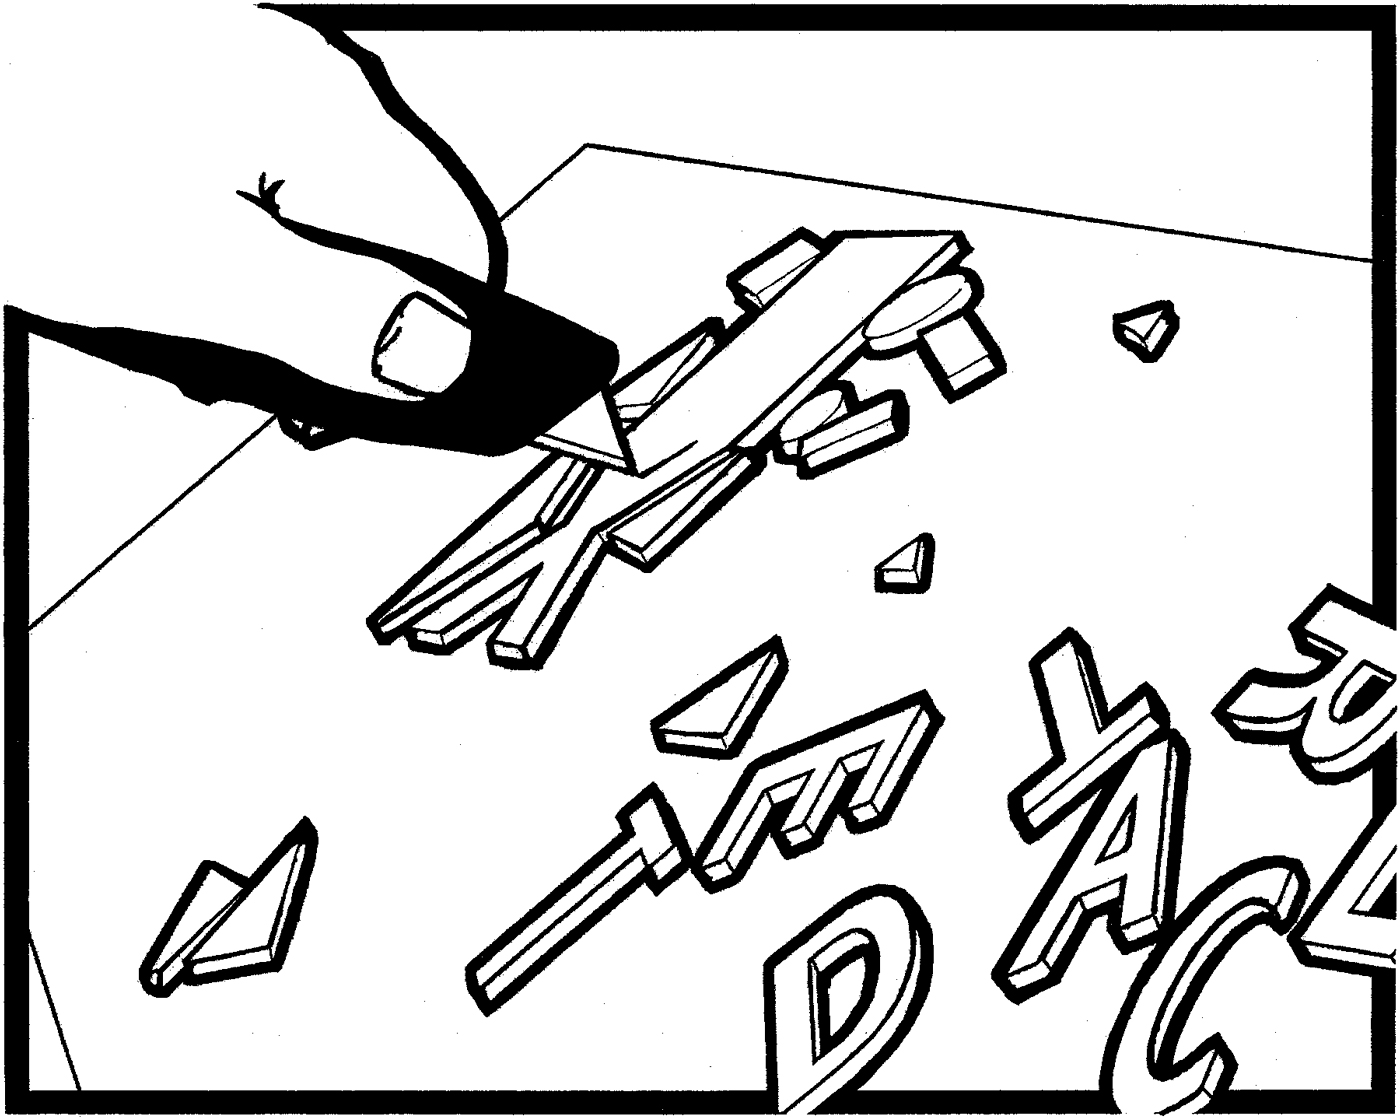
Figure 1.6.
Next, trace the text (figure 1.7). Lay out a piece of linoleum (not VCT) and arrange your text on it. Using a fine-point permanent marker or dark pencil, make a close tracing of each letter, or place the entire text on the linoleum at once and use a light dusting of spray paint to transfer the letters precisely onto the background. If you use the spray paint method, lay out the text backwards, so the paint will be on the back side of your tiles.

Figure 1.7.
Now, cut out the negative space. Use a sharp blade, and make sure your linoleum is warm. Cut out the traced letters as precisely as possible (figure 1.8). Save the spaces in the letters, such as “O” and “B” to put back in. Save the letters you cut out; you can use them with a background of a different color for your next design. Toynbee-style pieces do not require an 1/8-inch gap between pieces—in fact, the tighter the fit, the better.
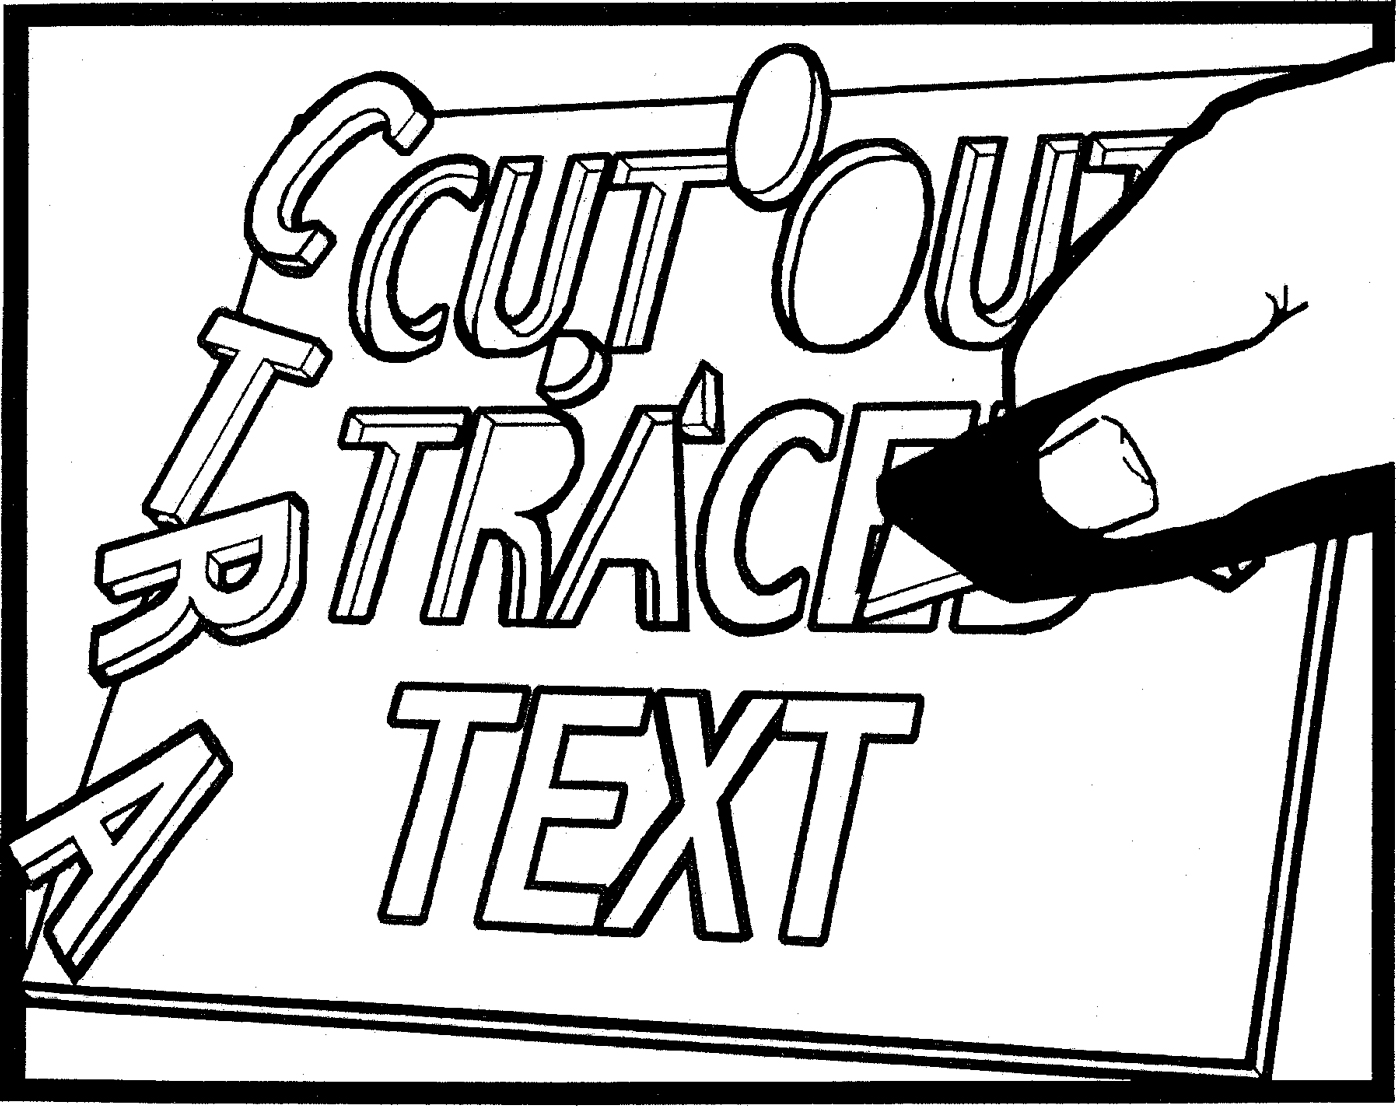
Figure 1.8.
Staple or tape a piece of tarpaper on a flat portable surface—cardboard and plywood both work well. Cover the tarpaper with a thin, even layer of waterproof wood glue. Spread the glue so it covers an area larger than your design by at least two inches on all sides. Next, place the design. Lay the linoleum background onto the wet glue so that the readable side is stuck to the tarpaper. Fit each letter into place (figure 1.9). Thoroughly remove any glue that has made its way into the side of the tiles not facing the tarpaper. When everything is in place, weigh the piece down with a board, and allow twelve or more hours for the glue to dry completely; it takes much longer than usual because there is hardly any airflow.
Figure 1.9.
After the glue is dry, apply the tar. Squeeze some tar onto the center of the design, and use a piece of card to spread it to a 1/16-inch thickness. Add a 1/2-inch perimeter of tar around the edge of the entire design.
Cut a piece of tarpaper in the shape of your design, and press the tarpaper into the wet tar, just as you would in preparing a mosaic design. Once the tarpaper is stuck flat, spread another layer of tar on the back of the tarpaper so it is completely coated with tar. The second layer of tar should be no more than 1/16-inch thick.
Finishing and Installing
Let your piece dry. In warm sunlight, most crack fillers will dry sufficiently in eight hours; in the shade of indoors, it could take up to twenty-four hours. When you think it is safe to handle your piece, detach it from the board. The side that has been facing the board is the top of your mosaic. Trim the tarpaper on the top side so that it is a half-inch bigger than the tar-coated tarpaper on the bottom side. The layer of tarpaper on top of your piece will remain until it is washed or worn away.
Prepare the bottom surface of your piece. Different tar products dry to different consistencies. If your tar has dried like a tire rubber—flexible, yet dry to touch—use a paper towel to spread a very thin layer of fresh tar to the bottom side. The goal here is to create a sticky surface, not to make a layer of wet tar! If your tar has dried to be flexible and sticky, it is not necessary to add fresh tar.
Find a spot. Asphalt crack filler sticks only to asphalt such as is used to make roads, sidewalks, and paths. It does not work on concrete, brick, or cobblestone. Find a high visibility location. We recommend crosswalks, as your piece is probably scaled for pedestrian viewing: pedestrians will be able to enjoy your work as they cross the road, and the passing cars, will help mash the piece into the asphalt. Also, in their capacity as dumb and dangerous moving objects, cars will faithfully deter someone from kneeling down to pick at your piece. Yes, just this once, cars are working for you!
Don’t let your masterpiece be covered up in the prime of its life just because the road needed repair. Your tile can last for ten year, possibly longer than its asphalt host. Apply your piece on the freshest asphalt you can find that is also a good location. Also, new asphalt is softer and stickier, and thus more receptive to your decorations.
Install your artwork. You should install your design during warm weather, when the asphalt is warm, soft, and dry. If the forecast calls for significant rains in the next few days, wait until they have passed. Bring a small brush to remove sand or debris from the road. Place your piece by simply setting it down, tar side to the road. Now walk, skip, jump, and run all over it to make sure it is firmly planted. The top layer of the tarpaper will serve to camouflage and stabilize your piece for the first few weeks, when it is most vulnerable, while it begins to join with the road. Eventually, the top layer will wear through or wash away, unveiling your masterpiece.
Tips
You can give your tile more time to set into the asphalt by adding extra layers of tarpaper on top of the design. Before you go out, cut two pieces of tarpaper a few inches bigger than your tile all around. Smear the pieces of tarpaper with a generous amount of glue, and stick them together glue side to glue side. This will keep them from drying out or sticking to things on the way to the installation site. Once you have laid the tile down and walked on it a bit, peel the two pieces of tarpaper apart and paste them—one on top of another—over the tile.
Brightly colored tiles look the best on asphalt; colors like dark green tend to be invisible unless they are used effectively with other colors. Make sure there is plenty of color or tone contrast between your figure and its background, especially if your design includes text.
Experiment with other materials! You have probably seen pennies, fasteners, and bits of brake light embedded in asphalt at intersections; thin bits of metal, mirror, or plastic will work too.
To make cutting easier, heat your VCT or linoleum with a heat gun or in an over set on warm; make sure the area in which you do this is well ventilated.
As with stickers and stencils, pizza boxes are great for transporting pieces to their designated sites (figure 1.10).
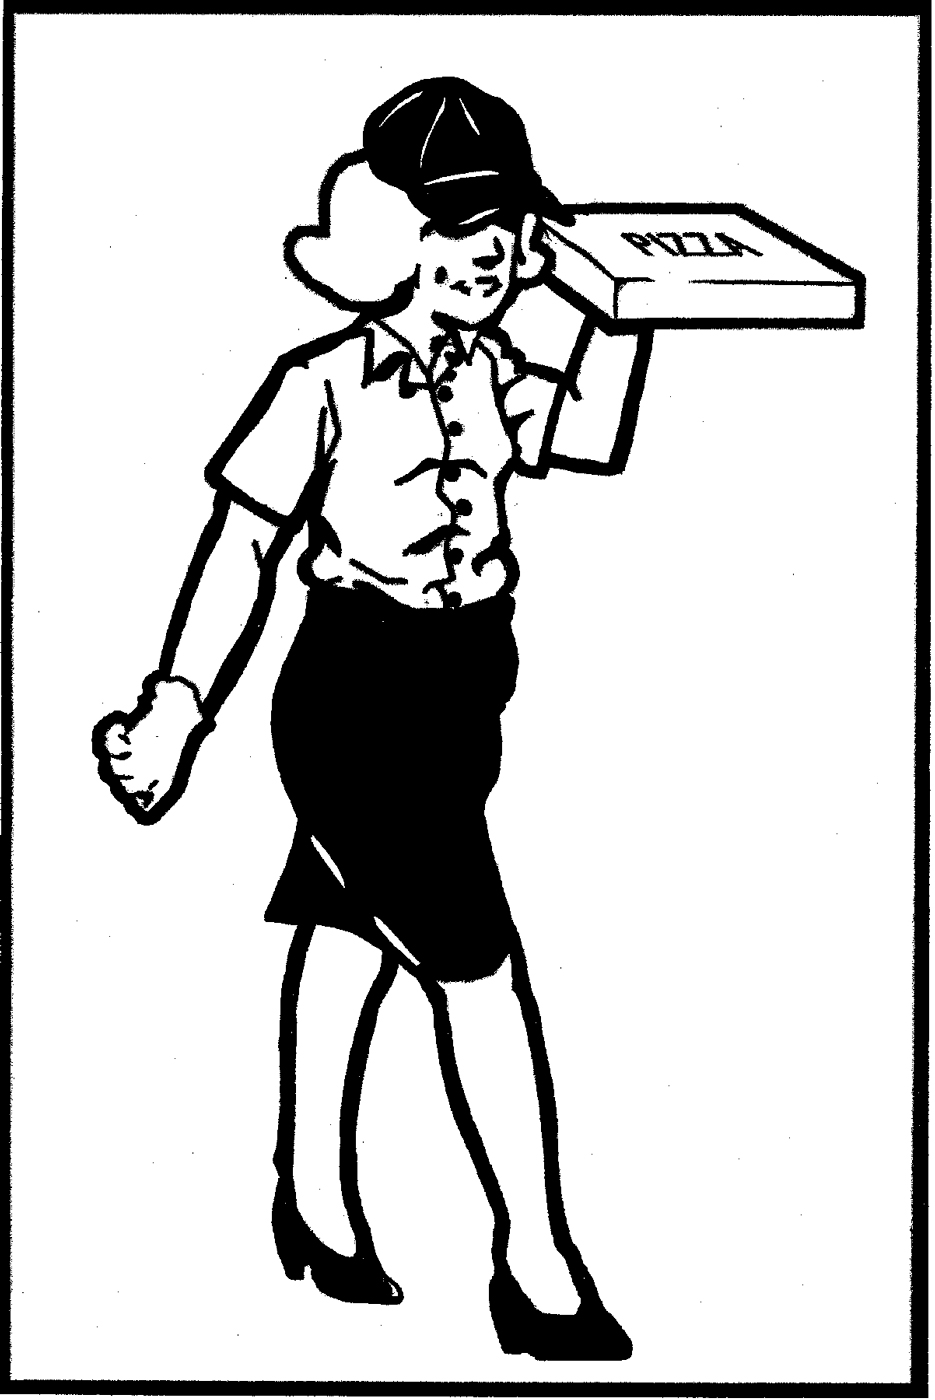
Figure 1.10.
This technique has a lot to recommend it over standard graffiti and wheat pasting: it can be more permanent, it makes use of a medium not yet often utilized creatively, it is still virtually unknown to the authorities and so can be remarkably easy to get away with.
Here’s a dare: make asphalt mosaics as popular—and unpopular—tomorrow as spray paint murals are today!
Account: The Adventure of Our Lives
The following is excerpted from the report on the 2007 CrimethInc. convergence.
In August 2003, after participating in the CrimethInc. convergence described in “Under the Helicopters,” my barnstorming group made one more tour stop—in Athens, Ohio. By that time, following an unplanned parade-turned-riot and subsequent media feeding frenzy, there was an APB out and police officers were waiting for us everywhere we went.
Our final evening of performances and workshops went smoothly enough until the conclusion. We’d been ending each event by teaching people how to make the asphalt tile mosaics described in Recipes for Disaster, then affixing one in a street as a token of our passing. We debated briefly as to whether we should attempt this act of unorthodox vandalism under the watchful eyes of the police, and finally concluded—as we always do—that we had to go for it and let the consequences sort themselves out. A slapstick scene ensued such as one might see in a European comedy: imagine us running around the campus pursued by police and audience members, attempting to elude the former and put down our tile mosaic in front of the latter. In the end, we succeeded in deploying the mosaic, but were followed by police to the house we’d intended to stay at and had to escape through the back alley to sleep somewhere else.
Months later, unbeknownst to us and against all odds, the mosaic remained in the parking lot—somehow the police never bothered to have it removed. Long before we ever met, the person who is now my lover and partner walked past a colorful heart set into the asphalt on her way to class every day, wondering how it came to be there.
Fast-forward nearly four years, to the end of July 2007. The tile mosaics our barnstorming tour put down have been paved over and the passionate friendships that bound our group together have cooled. All of us are now involved in new projects and friendships—for example, I’m back in Athens, in an unpermitted parade at the conclusion of the sixth CrimethInc. convergence, surrounded by hundreds of costumed maniacs. Some of them are spinning fire; others are beating improvised percussion instruments, including one enormous drum pushed on a shopping cart; still others have just dislodged an enormous road blockade reading “ROAD CLOSED” from a construction site and are carrying it to the front. Among the whirling dancers and masked faces, through the haze of enthusiasm and good cheer, I can make out a couple people who were with me here four years earlier. We’ve covered a lot of ground in that time.
My partner calls me over to a spot in the road. There, set in the asphalt, as fresh and bright as the day we put it there, is a colorful tile heart.
When experiments like these work, they connect us to spaces and to each other in a magical way, giving our lives back the narrative meaning that capitalism drains from everything. They may not immediately overthrow the government or abolish private ownership of capital, but they give us the networks, experience, and sense of our own power necessary for tilting at such monstrous windmills. Separated from our ongoing struggle for liberation they are senseless, but they aren’t only useful as incremental steps towards liberation—they also are that liberation, as we recapture our lives, moment by moment, from routine and obedience.
“Resurrect Dead - The mystery of the Toynbee Tiles (2011).” You can also learn more at Steve Weinik’s website.